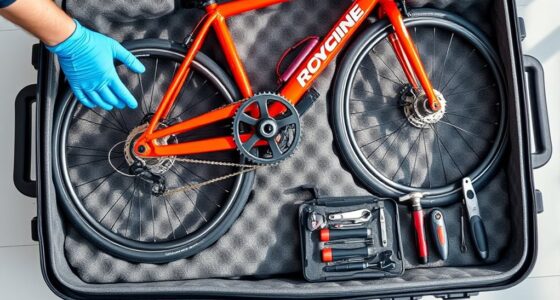
To replace a cassette, gather tools like a lint-free cloth, isopropyl alcohol, and a good condition cassette. Turn off your stereo or cassette player before opening the compartment. Carefully eject the old cassette by holding the edges to avoid contact with the tape, then inspect and clean the exterior of the new cassette if needed. Insert it securely, ensuring proper alignment, and close the compartment. If issues arise, troubleshooting steps can help you maintain audio quality; continue exploring for detailed guidance.
Key Takeaways
- Gather essential tools: lint-free cloth, isopropyl alcohol, and a compatible cassette.
- Turn off the stereo or cassette player before opening the compartment.
- Carefully eject the old cassette, then inspect and prepare the new cassette for insertion.
- Properly align and securely insert the new cassette into the guides.
- Test playback and clean the tape heads if sound quality issues arise.

Replacing a cassette might seem straightforward, but doing it correctly guarantees your stereo continues to produce clear sound. Before you immerse yourself in swapping out the tape, it’s important to consider how your overall setup impacts playback quality. If you have a turntable or other audio equipment, regular turntable maintenance becomes essential to keep everything functioning smoothly. Dust, dirt, and old lubricant can cause unwanted noise or even damage your records and stylus. Similarly, for vinyl records, proper vinyl cleaning removes dirt and static, ensuring cleaner sound and less wear on your equipment. While these steps aren’t directly related to cassette replacement, maintaining your audio gear enhances the overall listening experience, making every playback crisp and clear.
When you’re ready to replace the cassette, start by gathering the right tools. You’ll need a clean, lint-free cloth, possibly some isopropyl alcohol for cleaning, and a replacement cassette that’s in good condition. First, turn off your stereo or cassette player and open the tape compartment carefully. Gently eject the old cassette, holding it by the edges to avoid touching the tape itself, which can lead to fingerprints or dirt transfer. Before inserting the new cassette, inspect it for any visible damage or dirt. If needed, wipe the exterior with a soft cloth. Avoid touching the tape inside, as oils from your fingers can degrade sound quality over time. Additionally, ensuring the proper alignment of the cassette within the deck helps prevent playback issues.
Once the new cassette is ready, insert it into the compartment, aligning it properly with the guides. Close the compartment securely and press play to test the playback. During playback, listen for any distortions or irregular sounds. If you notice issues, it might be worth cleaning the tape heads or the internal parts of your cassette deck. Regularly cleaning the tape heads with a cotton swab dipped in isopropyl alcohol can drastically improve sound quality and extend the life of your tapes. This kind of turntable maintenance isn’t just for vinyl records; it applies to cassette decks too. Keeping your equipment clean ensures that your tapes play smoothly and without interruption.

Arsvita Audio Cassette Head Cleaner, Tape Cleaning Kit for Home/Portable/Car Cassette Player
【Why You Need It?】Clean the player head and maintain playing out premium sound quality.
As an affiliate, we earn on qualifying purchases.
As an affiliate, we earn on qualifying purchases.
Frequently Asked Questions
How Do I Identify the Correct Cassette Size for My Bike?
To identify the correct cassette size for your bike, check your current gear ratio and the number of speeds on your existing cassette. Look at the existing cassette’s markings or consult your bike’s manual to verify compatibility. Measure the freehub body to confirm it fits the new cassette. Matching these factors guarantees proper cassette compatibility, allowing smooth shifting and ideal performance.
Can I Replace a Cassette Without Removing the Wheel?
Did you know that over 60% of bike maintenance issues stem from improper gear compatibility? You can replace a cassette without removing the wheel if your bike has a quick-release or thru-axle system that allows wheel removal easily. Just shift to the smallest gear, loosen the lockring, and slide the cassette off carefully. make certain your new cassette matches your gear system, then reassemble and check for smooth shifting.
What Tools Are Essential for Cassette Replacement?
You’ll need a few essential tools for cassette replacement. An overview of these tools includes a cassette lockring remover, a chain whip, and a compatible cassette tool. Common difficulties involve loosening the tight lockring and removing the cassette without damaging the freehub. Make sure to have a clean rag and gloves for safety and cleanliness. With the right tools and patience, you can easily replace your cassette and keep your bike running smoothly.
How Often Should I Replace My Bike’s Cassette?
Think of your bike’s cassette as the heartbeat of your ride—it needs regular care. You should replace it every 2,000 to 3,000 miles or when you notice slipping and grinding. Follow maintenance tips closely, and avoid common mistakes like neglecting cleaning or forcing parts. Staying attentive guarantees smooth gear shifts and prolongs your cassette’s life, keeping your ride seamless and trouble-free.
Is It Possible to Upgrade to a Higher Gear Cassette?
Yes, you can upgrade to a higher gear cassette, but you should consider gear ratios and compatibility issues first. Check if your derailleur and shifter support the new cassette’s gear range. Higher gear cassettes often have different numbers of teeth, which can affect shifting performance. Make sure your current drivetrain components are compatible, and if not, you might need to upgrade those as well for smooth, reliable shifting.

Flutesan Cassette Tape Repair, 25pcs Replacement Felt Pressure Pads with Tweezers and Skewers
Cassette Tape Repair Kit: you will receive 25 pressure pads, 1 tweezer and 1 bamboo skewer to restore…
As an affiliate, we earn on qualifying purchases.
As an affiliate, we earn on qualifying purchases.
Conclusion
Now that you’ve replaced the cassette, you’re all set to hit the road with fresh gear. Just like a trusty knight keeps his sword sharp, maintaining your bike guarantees smooth rides ahead. Don’t forget to double-check that everything’s tight and in place—no need for a “Hark, what light through yonder window breaks?” moment on your ride! With a little care, your bike will serve you well, ready for any adventure, just like the trusty steed of old.
Arsvita Audio Cassette Head Cleaner, Tape Cleaning Kit for Home/Portable/Car Cassette Player
【Why You Need It?】Clean the player head and maintain playing out premium sound quality.
As an affiliate, we earn on qualifying purchases.
As an affiliate, we earn on qualifying purchases.
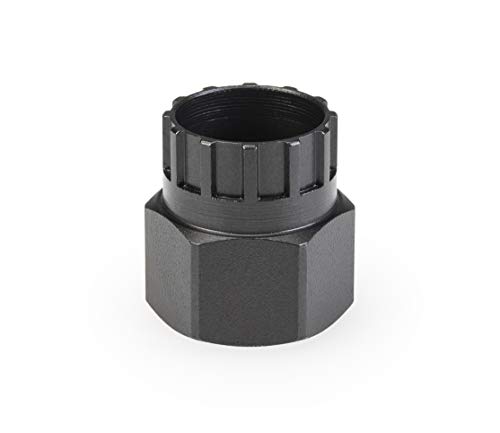
Park Tool FR-5.2 Cassette Lockring Tool, Metal
Park Tool FR-5.2 Cassette Lockring Tool
As an affiliate, we earn on qualifying purchases.
As an affiliate, we earn on qualifying purchases.