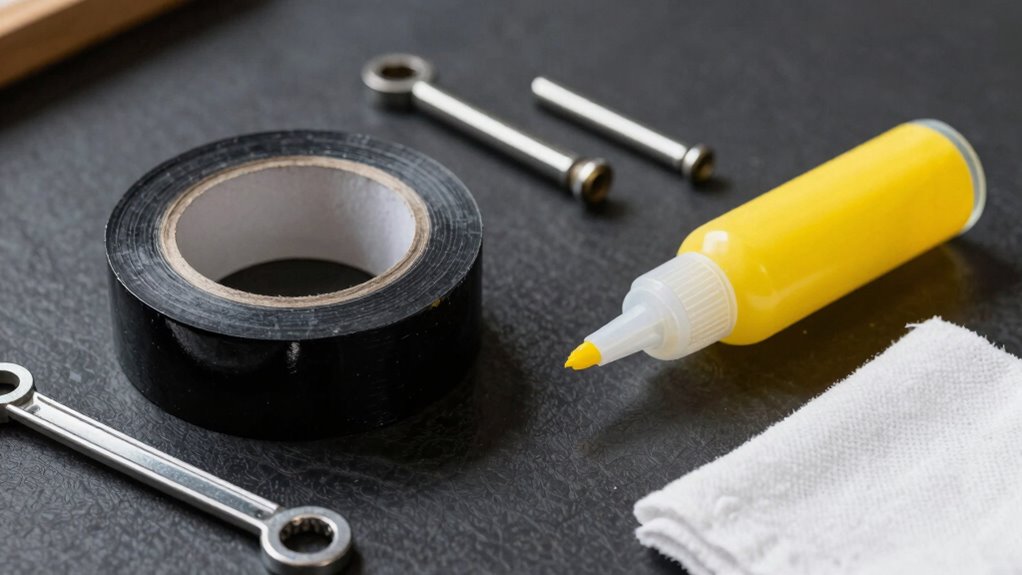
To convert to tubeless tonight with no drama, gather the right tools like tubeless tape, valves, sealant, and tire levers. Remove your old tires, clean the rims thoroughly, then carefully apply the tape, making sure all spoke holes are covered. Install the valves securely, add sealant through the valve, and inflate to seat the bead. Keep checking for leaks, and if you’re curious about perfecting each step, you’ll find more tips below.
Key Takeaways
- Gather tubeless-ready tires, rims, rim tape, sealant, valve cores, and a pump or compressor before starting.
- Remove old tires, thoroughly clean the rim bed, and apply tubeless rim tape ensuring full coverage and no gaps.
- Install tubeless valves securely, then add sealant through the valve, rotating the wheel to distribute evenly.
- Inflate the tire to seat the bead, check for leaks, and ensure the sealant coats the interior properly.
- Recheck pressure and sealant, address any leaks promptly, and enjoy your tubeless setup with minimal drama.

Roadbox Men's Mountain Bike Pants, Winter Thermal Fleece Lined Cycling Pants with Zip Pockets, Waterproof Windproof for Cold Weather Bicycle MTB Running Hiking Outdoor Black
Cold Resistance, Waterproof & Windproof: Fleece-lined interior traps heat for enduring warmth, waterproof outer shell blocks wind/rain, keep...
As an affiliate, we earn on qualifying purchases.
Gather Your Tools and Materials for a Fast Tubeless Setup
Before you begin your tubeless conversion, make sure to gather all the tools and materials needed for a smooth setup. You’ll need rim tape for proper rim tape application, ensuring an airtight seal between the rim and tire. Check that you have a compatible tubeless-ready tire and rim. A floor pump or air compressor will help with tire bead seating, making sure the bead seats properly onto the rim. Sealant is essential for sealing small leaks and maintaining air pressure. Also, have valve cores and a valve removal tool on hand for installing the tubeless valve. Having everything ready beforehand saves time and prevents interruptions during the process. Proper projector setup ensures optimal image quality and a seamless viewing experience. Additionally, understanding free floating techniques can help in troubleshooting common issues during the conversion process. Being familiar with air pressure management can also help ensure a successful and lasting tubeless conversion. Recognizing common problems and solutions can further streamline your setup. With your tools and materials prepared, you’re set for a quick, effective tubeless conversion. For instance, ensuring your rim tape is properly applied prevents air leaks and maintains the integrity of the seal.

INBIKE Cycling Running Pants Jogger Winter Windproof Long Straight Sweat Pants Black Large TJ
Quick-dry moisture-wicking fleece pant is made of 100% polyester, high stretchy and breathability, soft and comfortable to wear.
As an affiliate, we earn on qualifying purchases.
Remove Old Tires and Clean Your Rims for a Proper Seal
Removing your old tires and thoroughly cleaning your rims is essential for a reliable tubeless setup. Proper tire removal guarantees no debris or remnants interfere with sealing. Follow these steps:
Thoroughly clean and inspect rims after tire removal for a reliable tubeless setup.
- Deflate the tire completely and use tire levers to carefully pry it off the rim.
- Inspect the rim for any damage or debris, then use a brush or rag to remove dirt and old sealant.
- Clean the rim bed thoroughly with isopropyl alcohol or rim cleaner to ensure a good seal. Utilizing proper cleaning techniques can prevent air leaks and improve durability.
- Dry the rim completely before proceeding with tape application and valve installation. Ensuring the rim is clean aligns with the principles of sustainable maintenance by promoting proper setup and care.

FROGG TOGGS Men's Pilot Reflective Waterproof Motorcycle Pant, Black/Silver, X-Large
The Pilot Rain Pant is a reflective, waterproof pant with a locking web belt perfect for motor-cyclists
As an affiliate, we earn on qualifying purchases.
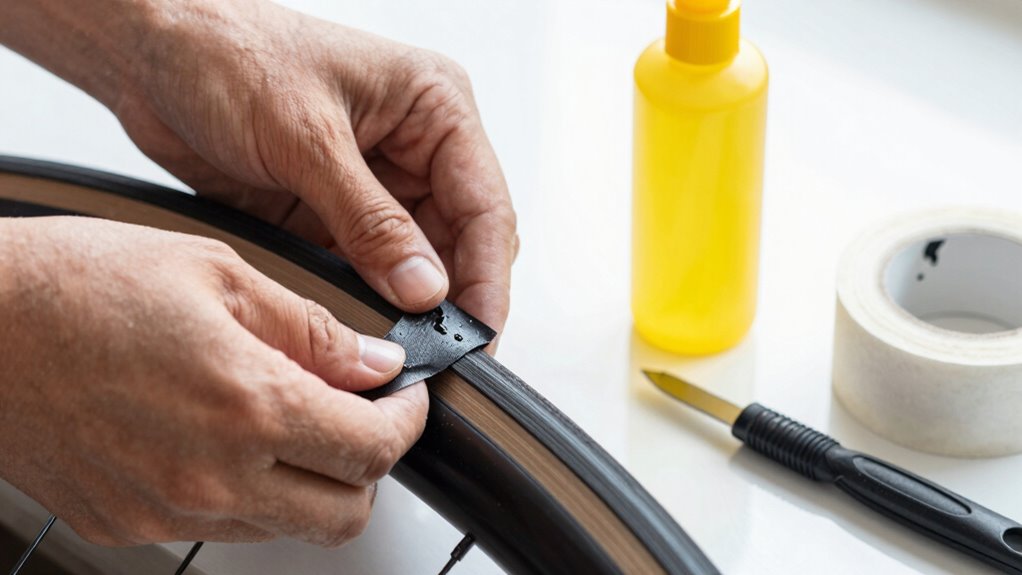
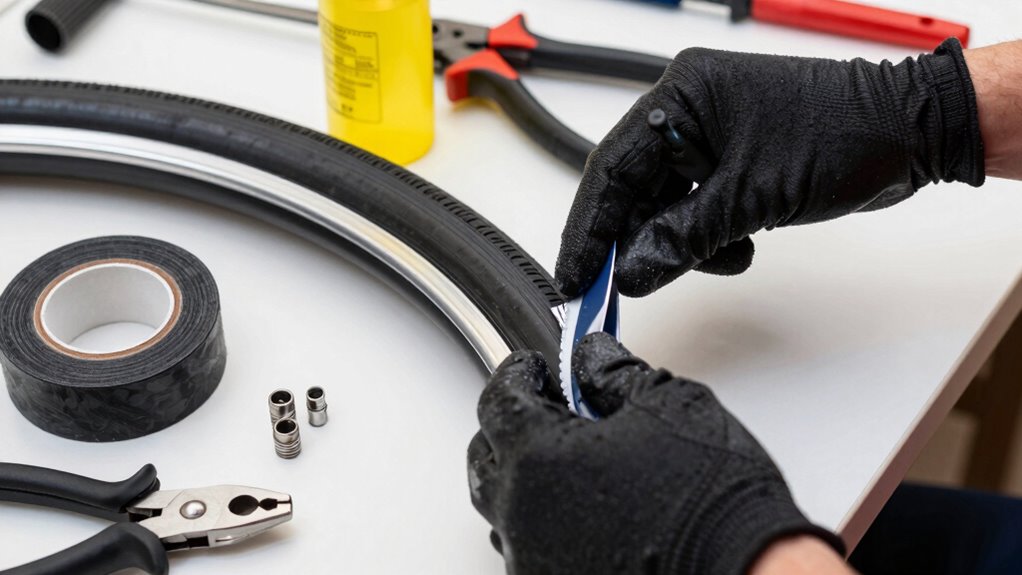
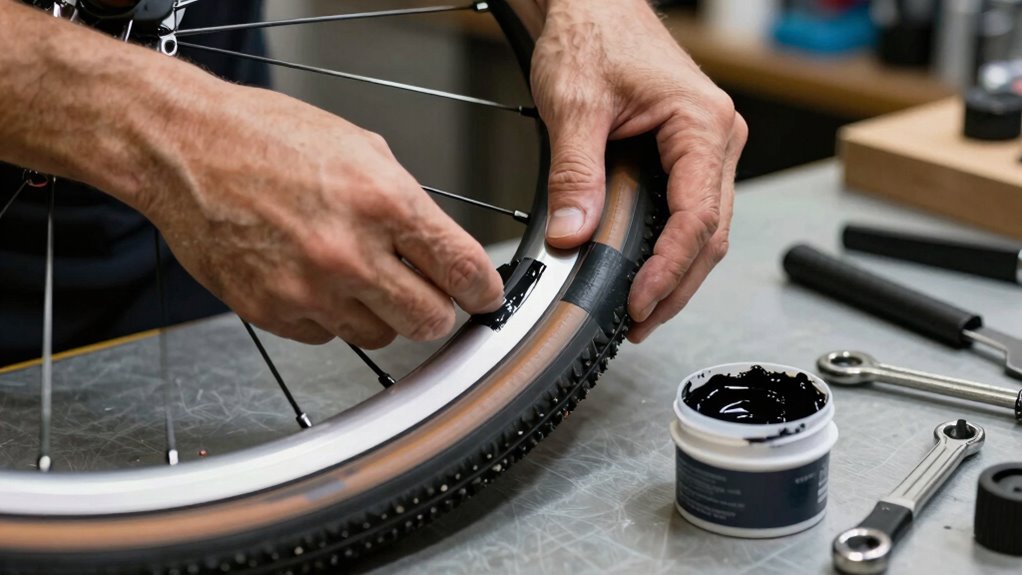
Apply Tape and Install Tubeless Valves Correctly
Applying tape and installing tubeless valves correctly are essential steps to guarantee an airtight seal. Begin with rim preparation by ensuring the surface is clean and free of debris. Carefully wrap the tubeless tape around the rim bed, overlapping edges slightly to cover all spoke holes completely. Make sure the tape is flat and secure to avoid leaks. When installing the valve, insert it through the valve hole in the rim, then tighten the locking nut on the exterior to create a proper seal. Double-check that the tape covers all areas around the valve stem and that the valve is straight and secure. Proper valve installation and rim preparation prevent air leaks and ensure your tubeless setup holds pressure effectively from the start. Ensuring airtight seals is crucial for reliable tubeless performance. Additionally, verifying that the tape adhesion is sufficient helps maintain the integrity of the seal over time. Ensuring that all components are properly aligned and tightly secured will help prevent air leaks during riding. Paying close attention to proper installation techniques can significantly improve your tubeless system’s longevity and performance.

ROCKBROS Winter Cycling Pants Warm Ergonomics Men's Windproof Thermal Bicycling Pants Black
3-LAYERS RECYCLE THERMAL PANTS: ROCKBROS cycling pants fleece inside keep you warm in cold weather. Moreover,3 layers recycle...
As an affiliate, we earn on qualifying purchases.
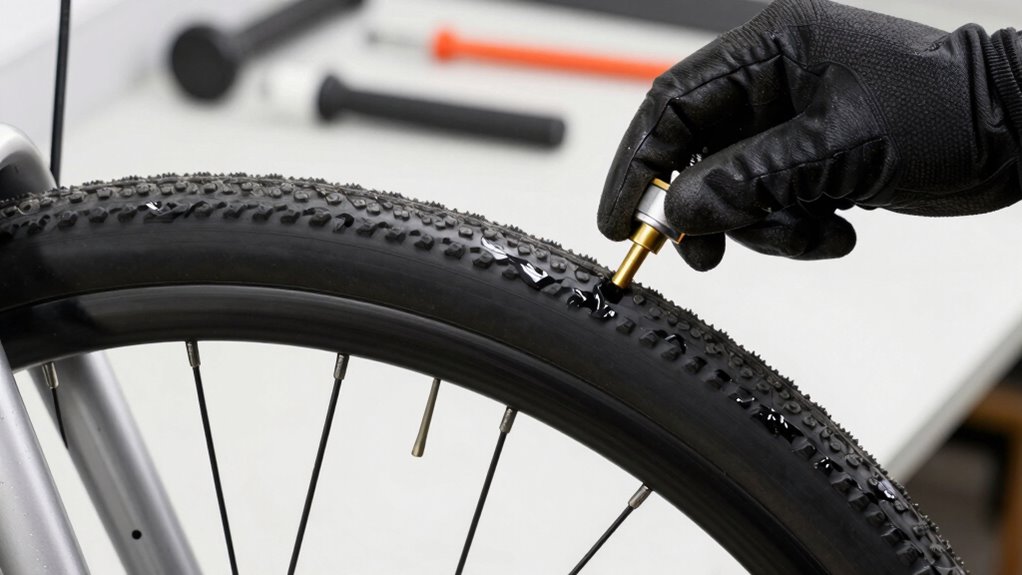
Fill With Sealant and Check for Leaks
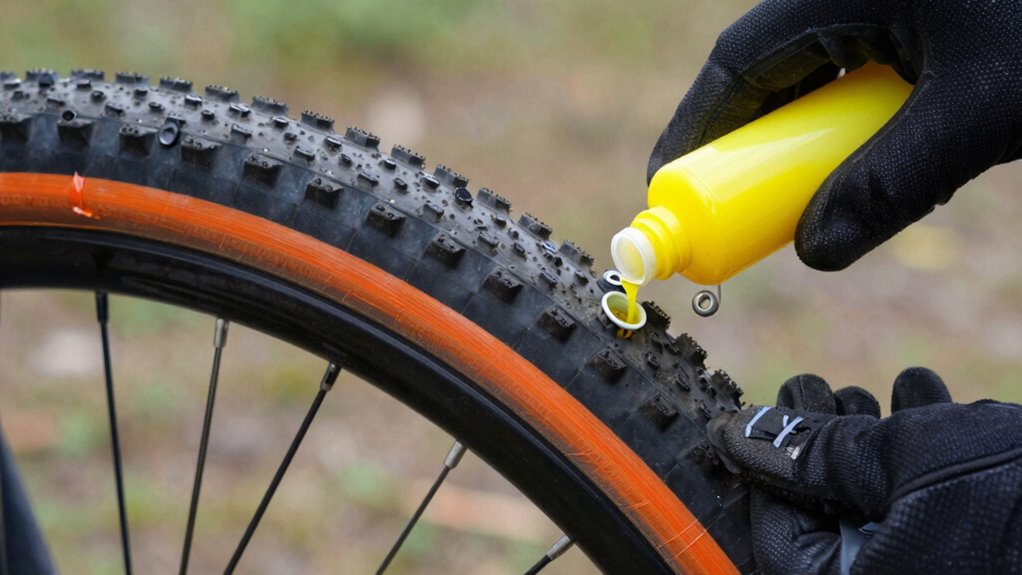
Once the tubeless tire is seated properly on the rim and the valve is secure, it’s time to fill the tire with sealant. Shake the sealant bottle well and remove the valve core if possible to make filling easier. Then, inject the recommended amount of sealant through the valve. Afterward, quickly rotate and bounce the tire to distribute the sealant evenly inside. Check the air pressure and inflate the tire to your desired tire pressure, ensuring it’s consistent with your riding needs. To confirm there are no leaks, listen for hissing sounds and inspect around the valve and bead. Proper sealing guarantees a smooth, leak-free ride. Regularly inspecting for air loss or leaks can help maintain optimal performance and safety, and staying vigilant about sealant distribution ensures the best seal. Additionally, monitoring for wave and wind effects can help identify if external conditions are affecting the seal integrity. Understanding tire sealing techniques can further improve your tubeless setup and prevent common issues. Using quality tools and materials, like tire levers and high-quality sealant, can make the process more effective and reduce the risk of damage.
Troubleshoot Sealant and Finalize Your Tubeless Conversion
After filling your tire with sealant, it’s essential to troubleshoot any issues to guarantee a reliable, leak-free ride. First, check the sealant consistency; it should be fluid enough to coat the inside of the tire evenly but not too runny. If it’s too thick, it won’t seal effectively, and if it’s too thin, it might leak out. Inspect the rim tape tension—if the tape isn’t seated properly or is loose, air and sealant can escape, causing leaks. Ensure the tape covers all spoke holes tightly and is free of tears. Rotate the wheel to distribute the sealant, watching for any signs of persistent leaks. Adjust the rim tape if necessary, then re-inflate and test for leaks. Proper troubleshooting ensures your tubeless setup is airtight and ready for riding. Additionally, understanding how to maintain your tire pressure can help prevent future issues and extend the life of your tubeless tires. Regularly checking sealant freshness can also improve sealing performance over time.
Frequently Asked Questions
Can I Convert Any Type of Bike Wheel to Tubeless?
You can’t convert any bike wheel to tubeless without verifying wheel compatibility and rim preparation. Most modern rims are tubeless-ready, but some older or specialized wheels might need specific tape or rim strips. Before starting, confirm your rims can handle tubeless setups, thoroughly clean and prep the rim surface, and use the right tape and sealant. If your wheel isn’t compatible, conversion could be difficult or risky.
How Long Does the Sealant Typically Last Before Needing Replacement?
Sealant typically lasts about 2 to 6 months, depending on riding conditions and sealant type. You’ll want to verify its effectiveness regularly; if you notice leaks or low pressure, it’s time for sealant renewal. Keep an eye on the sealant lifespan, especially if you ride in wet or muddy conditions, as it can break down faster. Regular renewal ensures your tubeless setup stays airtight and reliable.
Is It Necessary to Remove the Tire Completely During Conversion?
No, you don’t have to remove the tire completely during conversion. Just a quick tire removal helps you do rim cleaning and tape application more effectively. Skipping this step might seem like a shortcut, but it’s like ignoring rim debris—eventually, it’ll cause leaks or sealant failure. So, take a few minutes to remove the tire, clean the rim thoroughly, and make certain of a smooth, drama-free tubeless setup.
What Are Common Signs of a Failed Tubeless Seal?
If you’re noticing air leakage or inconsistent sealing, your tubeless setup might have failed. Common signs include frequent losing of air, the sealant not forming a consistent bead, or visible leaks around the rim or tire bead. You might also hear hissing sounds or see bubbles when inspecting the tire. These issues indicate that the seal isn’t holding properly, and you may need to recheck the installation, add more sealant, or reseal the tire.
Can I Reuse Old Tires for Tubeless Conversion?
You can reuse old tires for tubeless compatibility if they are in good condition, have minimal wear, and are free of cuts or significant abrasions. Check the sidewalls and tread for damage. Reusing old tires saves money and effort, but verify they’re compatible with tubeless setups. If they’re worn or damaged, it’s better to invest in new tires to guarantee a proper seal and safety during rides.
Conclusion
Converting to tubeless tonight is easier than you think—just follow these simple steps and you’ll be riding smoother than a spaceship gliding through space. With the right tools, patience, and a little sealant magic, you’ll transform your bike in no time. Don’t let doubts hold you back; this process is so straightforward, it’s practically foolproof. Before you know it, you’ll be conquering trails with zero drama and maximum confidence—ready to roll into your next adventure!