
TL;DR
Moving your rig into a closet or away from your workspace is the most effective way to cut noise. Proper placement and targeted acoustic treatment make a huge difference, while budget tricks can turn a small space into a quiet studio.
Imagine your AI workstation roaring in the corner, filling your home with noise. Now picture it tucked away in a closet, silent as a whisper. The secret isn’t just fancy foam or expensive panels — it’s about where you place your rig and how you manage heat and sound.
This guide shows you how to make your setup quieter and more efficient, with simple tricks and smart placement. Whether you’re building a DIY voice booth or just trying to tame your noisy GPU, you’ll learn what really works and what’s just noise.
Acoustic dampening
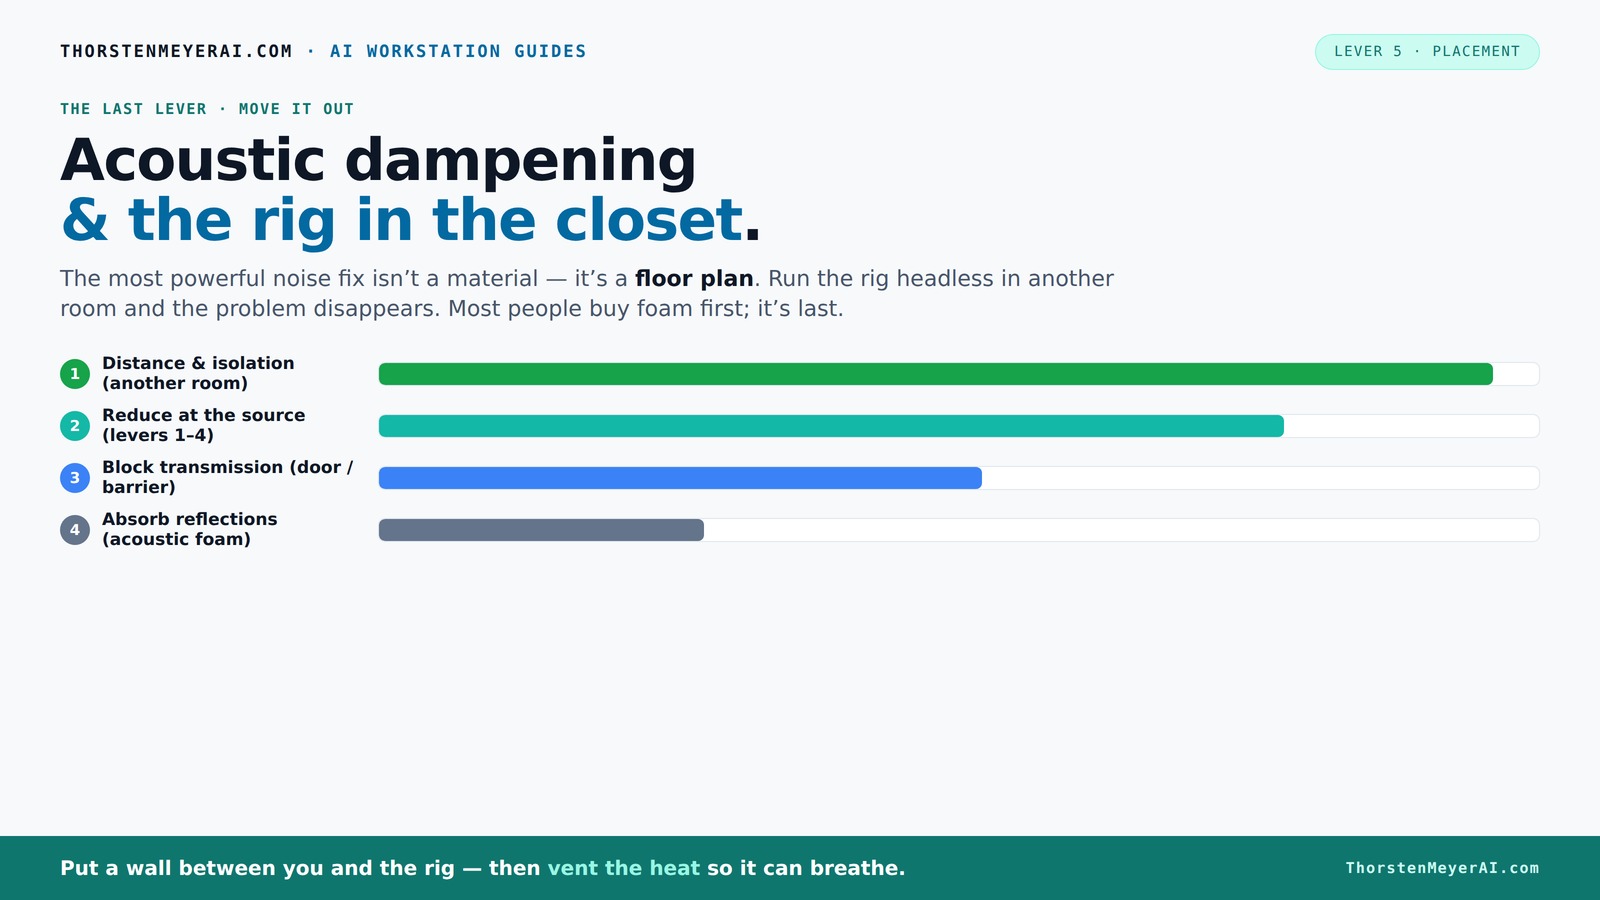
& the rig in the closet.
The most powerful noise fix isn’t a material — it’s a floor plan. A rig you can’t hear because it’s in another room beats any amount of foam. Tap the approaches in Part 1 to see what actually works.
(another room)
(levers 1–4)
(door / barrier)
(acoustic foam)
Contain the noise, not the heat
Key Takeaways
- The most effective way to quiet your rig is to move it out of your workspace into another room or closet.
- Proper ventilation is essential when placing a rig in an enclosed space — passive vents and quiet exhaust fans keep it cool without noise leaks.
- Acoustic dampening reduces echo but doesn’t block sound leaks; sealing gaps and adding mass matter more for soundproofing.
- Target treatment at reflection points: behind the mic, ceiling, door, and any hard surfaces that cause echo.
- Budget solutions like blankets, rugs, and rubber feet can make a big difference without costing much, especially when combined with good placement.

Focusound 52 Pack Acoustic Foam Panels 1" x 12" x 12" Sound Proof Foam Panles Soundproofing Noise Cancelling Wedge Panels for Home Office Recoding Studio with 300PCS Double-Side Adhesive
- Soundproofing Design: Triangular grooves for noise absorption
- Includes Adhesive Tape: 300pcs double-sided adhesive for easy installation
- Easy Shape Recovery: Reforms after soaking in water
As an affiliate, we earn on qualifying purchases.
As an affiliate, we earn on qualifying purchases.
Why Acoustic Dampening Isn’t the Same as Soundproofing
Acoustic dampening reduces the echo and reflections inside a room but doesn’t block sound from escaping or entering. Think of it like putting up curtains — it softens the noise but doesn’t stop it from leaking out.
Soundproofing, on the other hand, involves sealing gaps, adding mass, and creating barriers to block sound transmission. In a closet, foam might make the space less echoey, but it won’t stop your GPU’s hum from escaping if the door isn’t sealed tight.
Understanding this distinction is crucial because many assume foam alone will make their setup silent. Acoustic dampening is just one part of effective noise control. In reality, dampening improves internal acoustics but does little to prevent sound leakage. For effective noise control, combining dampening with sealing gaps and adding mass (like drywall or dense materials) is essential. This tradeoff means you can’t rely solely on foam if your goal is complete silence; you must address both internal reflections and external sound leaks.

2 Pack Studio Monitor Isolation Pads for Large Speakers Sound Insulation Studio Foam Prevents Vibrations Acoustic Speaker Isolation Pad High Density Fits Most Stands
- Enhanced Sound Clarity: Reduces vibrations for cleaner sound
- Universal Compatibility: Fits most studio monitors and brands
- Adjustable Angle: Allows precise monitor positioning
As an affiliate, we earn on qualifying purchases.
As an affiliate, we earn on qualifying purchases.
The First Step: Place Your Rig Where It Doesn’t Bother You
The best way to reduce noise is to move your rig out of your workspace altogether. Put it in a different room, a basement, or a closet. This is the simplest, most effective fix — no treatment needed.
If your rig communicates over the network, it doesn’t need to be next to you. You can SSH into it or access it via API, while your laptop stays silent on the desk. It’s like hiding the noisy neighbor in a back building, while you enjoy peace in the front yard.
Strategic placement isn’t just about silence; it’s about workflow efficiency. By positioning your rig away from your main work area, you reduce distractions and create a more focused environment. This approach also minimizes the need for complex acoustic treatments, saving time and money while giving you immediate noise reduction benefits.
For instance, a friend of mine moved his AI server into a spare closet across the hall. His workspace was suddenly silent, and he didn’t have to buy a single panel. This illustrates that thoughtful placement can often be the most straightforward and impactful step toward a quieter setup.

VEVOR Sound Dampening Blankets, Soundproof Curtains with 80 x 48 in, Soundproof Blanket with Grommets, Studio Grommeted Blanket, for Window, Door, Light Blocker, Music Recording, Black
- Sound Absorption & Noise Reduction: Reduces indoor echoes and sound reflections
- Effective Light Blocking: Blocks light for a dim environment
- Thickened Durable Design: Resists tearing and maintains shape
As an affiliate, we earn on qualifying purchases.
As an affiliate, we earn on qualifying purchases.
The 'Rig in the Closet' Setup — The Good and the Bad
Putting your noisy, heat-generating rig in a closet can be a game changer. It isolates sound, keeps your workspace quiet, and makes your setup look clean. But there’s a catch: heat.
A sealed closet traps heat, and a GPU pulling 600W can turn a closet into an oven. The temperature rises, fans spin faster, and noise increases — defeating the purpose of quieting down your setup.
The trick? Ventilation. Use passive vents, exhaust fans, or purpose-built soundproof cabinets with ducted airflow. Proper airflow not only cools your gear but also prevents heat buildup that can cause fans to run at higher speeds, which ironically increases noise. If cooling isn’t managed properly, the closet becomes a heat trap, leading to thermal throttling and potentially damaging your hardware. This tradeoff between noise reduction and heat management is critical; neglecting it can turn a quiet setup into a hot, noisy mess.
Understanding the importance of ventilation helps you design a closet setup that balances sound isolation with effective cooling. The right airflow solutions can make the difference between a quiet, cool rig and one that overheats and becomes louder over time.
Focusound 52 Pack Acoustic Foam Panels 1" x 12" x 12" Sound Proof Foam Panles Soundproofing Noise Cancelling Wedge Panels for Home Office Recoding Studio with 300PCS Double-Side Adhesive
- Soundproofing Design: Triangular grooves for noise absorption
- Includes Adhesive Tape: 300pcs double-sided adhesive for easy installation
- Easy Shape Recovery: Reforms after soaking in water
As an affiliate, we earn on qualifying purchases.
As an affiliate, we earn on qualifying purchases.
How to Ventilate a Closet Rig Without Losing Silence
Ventilation is the key to making a closet rig work long-term. Here’s what you should do:
- Install a passive vent or small duct to allow hot air to escape. This creates a natural airflow path without noise.
- Attach a quiet, low-RPM exhaust fan to pull hot air out — think of a bathroom fan but whisper-quiet. The fan should be positioned to exhaust hot air efficiently while minimizing noise transfer.
- Use ducting to direct hot air outside, away from your workspace, ensuring that the noise from the fan does not reach your main area.
- Monitor the temperature regularly — aim for under 85°F (29°C) for sustained performance. Overheating not only risks hardware damage but also causes fans to spin faster, increasing noise.
Some DIYers build custom soundproof cabinets with ducted airflow, combining sound absorption and heat dissipation. This setup keeps your rig cool and your room silent, a perfect balance. Investing in proper ventilation components ensures your closet remains both quiet and safe for your hardware, avoiding thermal shutdowns or damage caused by heat buildup. For more on cooling options, see this discussion on liquid vs. air cooling for inference rigs.
For a detailed look at cooling options, see this discussion on [liquid vs. air cooling for inference rigs](https://thorstenmeyerai.com/liquid-vs-air-cooling-inference-rig/).
Where to Focus Your Acoustic Treatment in a Closet
Acoustic treatment in a closet isn’t about covering every inch. It’s about targeted placement to tame reflections and reduce echo where it matters most.
Start with the wall behind your mic, the ceiling, and the door. For more tips on acoustic treatment, check out this guide. These are the prime reflection points that cause a hollow, boxy sound. Use thick foam panels (at least 2 inches) or blankets in these areas, focusing on the most reflective surfaces to absorb sound effectively and prevent it from bouncing around.
Don’t forget the floor — a rug or carpet absorbs slap echoes and prevents sound from reflecting upward. Cover gaps around the door with weatherstripping or acoustic sealant to prevent sound leaks. For bass issues, add bass traps in the corners if low-end buildup becomes noticeable. Proper placement of absorption materials targets the primary reflection points, significantly improving clarity and reducing noise leakage. This strategic approach ensures you get the most benefit from your acoustic treatment without unnecessary clutter.
Common Mistakes That Wreck Your Quiet Setup
Many DIYers focus only on installing foam in the corners or on the walls and think they’re done. But that’s a mistake. Sound leaks through gaps, around doors, and along unsealed cracks — defeating the purpose.
Using only thin foam or relying solely on corner traps can leave you with a hollow, echoey sound and noise escape routes. These treatments may improve internal acoustics but do little to prevent external sound leaks. Ignoring heat and airflow can turn your silent setup into a hot, noisy mess, as fans ramp up and noise escapes through unsealed gaps.
Another trap: assuming foam absorbs all frequencies equally. Thicker, denser panels are better at controlling lower frequencies, which are the hardest to tame in tiny spaces. This means understanding the acoustic properties of your materials and applying them where they’re most effective is key to achieving true quiet. Comprehensive sealing, proper placement of absorptive materials, and heat management are the pillars of a successful DIY quiet setup.
Budget-Friendly Ideas to Build a Quiet Closet Rig
Building a quiet, effective rig in a closet doesn’t have to cost a fortune. Here are some low-cost tricks:
- Use thick blankets or quilts to line walls and doors — they absorb sound and trap heat. These materials also dampen vibrations and reduce structure-borne noise.
- Place a dense rug or carpet on the floor to tame slap echoes and absorb sound reflections from the ground.
- Seal gaps around the door with weatherstripping or draft stoppers to prevent sound leaks.
- Position your PC on rubber feet or anti-vibration pads to cut structure-borne noise transmitted through the desk or floor.
- Use temporary foam panels or DIY absorption with household materials like egg crate foam or thick towels. These solutions provide effective noise absorption without high costs.
Combine these with proper ventilation, and you get a surprisingly quiet, cool setup. It’s about smart layering, not expensive gear, and understanding where to place materials for maximum effect.
Your Most Common Questions — Answered
What’s the difference between dampening, treatment, and soundproofing? Dampening reduces echoes inside a space; treatment targets reflections around the mic; soundproofing blocks sound from escaping. They serve different roles, and understanding their distinctions helps you prioritize your efforts. Dampening and treatment improve internal acoustics, making your recordings clearer, while soundproofing prevents noise from escaping to neighbors or other rooms. Combining these strategies based on your goals ensures an efficient approach to creating a quiet workspace.
Where should I place foam or panels? Focus on the wall behind your mic, the ceiling, and around the door. These are the key reflection points that cause echo and sound leaks. Proper placement ensures maximum absorption where it’s needed most, improving sound quality and reducing noise escape.
Do I need to treat the door and floor? Yes. Gaps around doors leak sound and hard floors reflect echoes. Seal gaps with weatherstripping or acoustic sealant, and add a rug or carpet to absorb slap echoes. These measures significantly improve your room’s acoustic profile and noise containment.
How thick should panels be for a small closet? For small spaces, 2-inch thick panels are generally sufficient to absorb mid and high frequencies. For better low-frequency control or larger, more reflective spaces, 4-inch panels are recommended to achieve deeper absorption and reduce resonance.
Will foam alone stop sound from escaping? No. Foam absorbs echoes and internal reflections but doesn’t seal gaps or add mass. For true soundproofing, you need to seal cracks, add dense materials, or use mass-loaded vinyl to block sound transmission effectively.
Frequently Asked Questions
What is the difference between acoustic dampening, acoustic treatment, and soundproofing?
Acoustic dampening reduces echo and reflections inside a space, making it sound less hollow. Acoustic treatment targets specific reflection points around the mic and room to improve clarity. Soundproofing involves sealing gaps, adding mass, and creating barriers to prevent sound from escaping or entering, effectively isolating the space. Understanding these differences helps you choose the right approach based on your goals—whether improving internal acoustics, reducing external noise, or both.
Where should I place acoustic foam or panels in a closet booth?
Focus on the wall behind your mic, the ceiling, and around the door. These are the main reflection points that cause echo and sound leakage. Proper placement of panels at these points maximizes absorption, reducing echoes and preventing noise from escaping, which results in cleaner recordings and a quieter environment.
Do I need to treat the door, floor, and ceiling?
Yes. Gaps around the door leak sound, and hard floors reflect echoes. Seal gaps with weatherstripping or acoustic sealant, and add a rug or carpet to absorb slap echoes. Treating these areas ensures minimal sound leakage and better internal acoustics, creating a more controlled environment for your recordings or work.
How thick should acoustic panels be for a small closet?
For small spaces, 2-inch thick panels are usually sufficient to absorb mid and high frequencies effectively. If you need to control lower frequencies or want a more versatile setup, 4-inch panels can provide deeper absorption, reducing resonance and resonance buildup in the space.
Will foam alone stop sound from escaping?
No. Foam absorbs internal echoes but won’t seal gaps or add mass to block sound transmission. For effective soundproofing, combine foam with sealing gaps around doors and walls, and consider adding dense materials like mass-loaded vinyl or drywall to prevent sound from leaking outside.
Conclusion
Moving your rig into a closet or another room is the single biggest step toward silence. Pair it with proper ventilation, sealing gaps, and targeted acoustic treatment, and you’ll turn a noisy setup into a whisper-quiet workspace. The real magic happens when you treat both sound and heat — the two biggest obstacles to a perfect DIY studio.
Imagine a small, cozy closet, humming with activity but whisper-quiet on the outside. That’s the power of smart placement and simple tricks. Your setup should serve your work, not drown it out. So next time someone asks about noise, tell them: it’s all about where you put it and how you manage heat.