
To adjust your bike fit, start with your saddle height so you can almost fully extend your leg with a slight bend at the knee’s lowest point. Next, tweak the handlebar position and reach so your back stays comfortable and relaxed. Adjust the saddle fore-aft to align your knee over the pedal axle, and tilt it slightly for comfort. Small, careful changes make a big difference—keep exploring these adjustments to get the perfect setup.
Key Takeaways
- Adjust seat height for near-full leg extension, with a slight knee bend at the pedal’s lowest point.
- Set handlebar height and reach to keep your back neutral, avoiding neck and back strain.
- Position the saddle fore-aft to align your knee over the pedal axle at 3 o’clock.
- Ensure saddle tilt is level or slightly downward to prevent pressure points and discomfort.
- Regularly fine-tune your bike fit to improve comfort, efficiency, and prevent injury during rides.
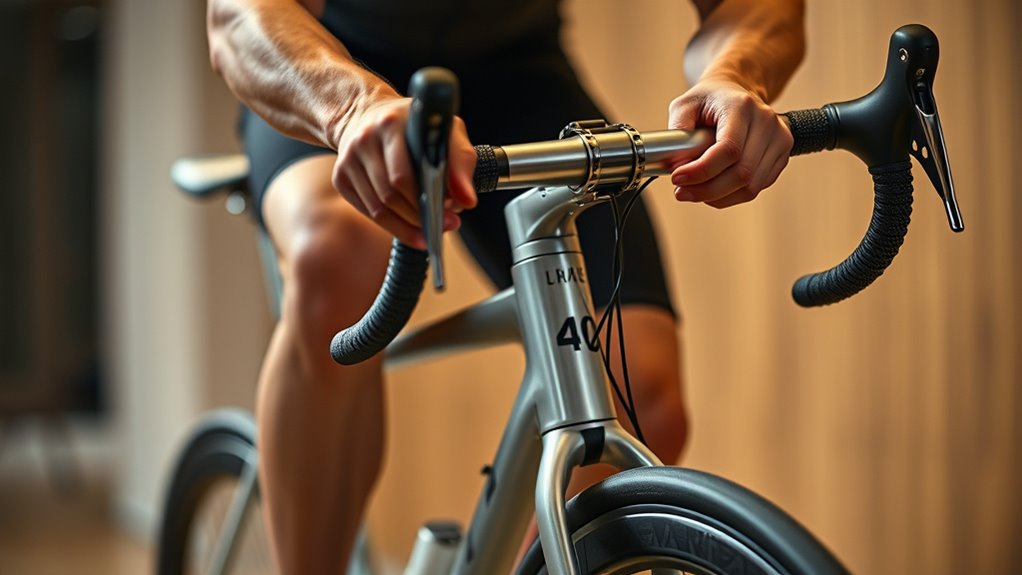
Getting your bike fit right is essential for comfort, efficiency, and preventing injuries. When you ride, every part of your bike should feel just right, not forcing you into awkward positions or causing discomfort. Proper adjustments can make a huge difference in how you perform and how much you enjoy your ride. The first step is addressing your seat height. You want your saddle at a height that allows your leg to extend almost fully at the bottom of the pedal stroke, with a slight bend—around 25-30 degrees—in your knee. To find this, sit on your bike with one foot on a pedal at the 3 o’clock position. Your leg should be almost straight, but not locked. Adjust the saddle so that this position feels natural. Too low and you’ll put unnecessary strain on your knees; too high and you’ll lose pedaling efficiency or cause discomfort in your hips. Once set, test ride and make small tweaks if needed, ensuring your hips don’t sway excessively and your pedaling feels smooth. A proper bike fit can also help improve your aerodynamics, making your rides more efficient over longer distances.
Next, consider your handlebar position. Handlebars should be at a height and reach that keeps your back in a comfortable, neutral position. If they’re too low, you’ll strain your neck and lower back; if they’re too high, you might lose power and control. To find the right setup, sit on your bike with your hands on the handlebars. Your elbows should be slightly bent, and your shoulders relaxed. The reach should allow you to hold the bars without overextending forward or feeling cramped. Moving the handlebars closer or further away alters your reach, so adjust accordingly. Many bikes have adjustable stems or handlebars, making this easier. Also, check the width of the handlebars—if they’re too narrow, you may feel cramped; if too wide, steering can become unwieldy. Pay attention to how your wrists and shoulders feel during a ride. If you experience pain or numbness, it’s a sign that your handlebar position needs fine-tuning. Additionally, proper bike fit can help prevent long-term joint issues and improve your overall riding performance. Remember, small adjustments can significantly impact your comfort and efficiency during rides. Maintaining a correct riding posture ensures that you avoid unnecessary fatigue and discomfort during longer rides.
In addition to seat and handlebar adjustments, consider your saddle fore-aft position and tilt. Sliding the saddle forward or backward affects your knee alignment over the pedals, impacting power transfer and comfort. A good rule is to position the saddle so that when your foot is at the 3 o’clock position, the bony protrusion just below your kneecap is roughly over the pedal axle. The saddle tilt should be level or slightly downward, depending on comfort, but avoid tilting it upward as this can cause pressure and discomfort. Making small, incremental adjustments and testing each time helps you dial in the perfect fit. Remember, bike fitting isn’t a one-time task; it’s an ongoing process that evolves as you become more aware of what feels best. Also, regular bike adjustments are crucial for maintaining optimal comfort and efficiency over time, especially as your flexibility and riding style change. Ensuring your bike fit remains optimal can also help prevent repetitive strain injuries and prolong your riding lifespan. Properly adjusted bike fit not only enhances your ride but also keeps you riding longer, stronger, and injury-free.
Frequently Asked Questions
How Often Should I Reassess My Bike Fit?
You should reassess your bike fit whenever you notice discomfort, pain, or a change in your riding performance. Regularly checking your position every few months is a good idea, especially if you’re riding frequently or increasing intensity. Changes in flexibility, strength, or even your bike setup can affect your fit. Listening to your body and making adjustments as needed will keep you comfortable, safe, and enjoying your rides.
Can I Adjust My Bike Fit Without Professional Help?
You wonder if you can tweak your bike fit without pros, and the answer is yes, but with caution. While minor adjustments like seat height or handlebar position are doable at home, avoid overcorrecting. Use your body’s feedback—pain or discomfort signals when something’s off. Start with small changes, test ride, and if issues persist, consider professional help. Your comfort and safety are worth the effort.
What Signs Indicate My Bike Fit Needs Changing?
If you notice discomfort or pain while riding, it’s a sign your bike fit might need changing. Look for numbness, tingling, or aching in your hands, wrists, or knees. If you feel unstable or your posture causes strain, that’s another indicator. Also, if you find yourself frequently adjusting your position or feeling fatigued quickly, it’s time to reassess your setup to guarantee comfort and efficiency.
How Do I Choose the Right Saddle for Comfort?
When it comes to choosing the right saddle for comfort, you need to find the sweet spot that feels just right. Think of it as Goldilocks — not too hard, not too soft. Consider your riding style, body shape, and riding duration. Test different widths and padding, and don’t rush it. A comfortable saddle makes every ride a pleasure, so take your time to find one that fits you like a glove.
Are There Differences in Fit Adjustments for Road vs. Mountain Bikes?
When fitting your bike, you’ll notice differences between road and mountain bikes. Road bikes emphasize aerodynamics and efficiency, so you might set the saddle higher for a more stretched position. Mountain bikes prioritize control and comfort on rough terrain, so you’ll often lower the saddle slightly and adjust handlebar height for better maneuverability. Overall, your adjustments should match your riding style and terrain to keep you comfortable and efficient.
Conclusion
Now that you know how to fine-tune your bike fit, you’ll ride more comfortably and efficiently. Remember, a proper fit isn’t just about comfort but also about avoiding injuries—kind of like how a well-made saddle keeps your horse happy. Don’t be afraid to experiment with seat height, handlebar position, and cleats. With a little patience, you’ll be riding like a modern-day knight—ready to conquer any trail or city street that comes your way.