When your wheel wobbles while riding, you can field true it to get home straight by first cleaning the rim and inspecting for damage. Spin the wheel and identify the worst wobble spots. Use this info to tighten or loosen nearby spokes gradually, aiming for even tension and less wobble. Make small adjustments and keep checking until the wheel spins true again. Continue with these quick tips, and you’ll learn more about maintaining a safe, straight ride.
Key Takeaways
- Clean the rim and spokes to clearly identify wobble and damage before adjustments.
- Spin the wheel and observe any side-to-side or up-and-down wobble to locate areas needing truing.
- Use a spoke wrench to tighten spokes on the side pulling the rim toward the spoke, and loosen on the opposite side.
- Make small, incremental adjustments, rechecking wheel alignment after each tweak.
- Focus on maintaining uniform spoke tension and avoid over-tightening to prevent damage.

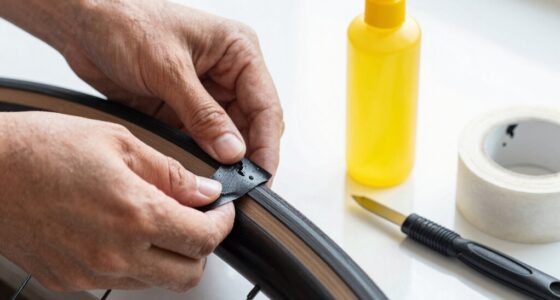
When your bike wheel becomes out of alignment or develops a wobble, it’s essential to true it properly to guarantee smooth riding and prevent further damage. Field truing allows you to make quick adjustments on the go, especially when you’re far from your workshop. The first step involves inspecting the rim thoroughly. Look for any dents, cracks, or deformities that could compromise the wheel’s integrity. Spin the wheel slowly and watch the rim’s movement against the brake pads or a fixed point. If it’s wobbling side to side or up and down, it’s time to adjust the spoke tension.
Start by checking the tension of your spokes. Uniform spoke tension ensures the rim stays true and maintains structural integrity. Use a spoke wrench to gently tighten or loosen individual spokes. If one side of the rim is pulled toward a specific spoke, tighten that spoke slightly. Conversely, if the rim pulls away, loosen the spoke. Remember, small adjustments make a big difference. Never over-tighten; instead, aim for a balanced tension across the wheel. It’s best to tighten spokes gradually, working evenly on both sides of the wheel to maintain symmetry.
While inspecting the rim, also check for any foreign objects, corrosion, or dirt that could affect spoke tension or wheel stability. Cleaning the rim and spokes can help you better gauge the true alignment and spot issues more clearly. If you notice any significant dents or cracks during the rim inspection, it might be best to seek professional help before riding further, as these could compromise safety. Additionally, understanding spoke tension is crucial for maintaining wheel integrity and performance.
Once you’ve checked the rim and adjusted the spoke tension, spin the wheel again to observe the wobble. Repeat the process of tightening and loosening spokes as needed, focusing on the areas that cause the most wobble. Patience is key—making small, incremental changes gradually yields the best results. Keep monitoring the rim’s movement and test ride if possible, to see if the adjustments hold.
In a field setting, this process might not produce a perfectly true wheel like a professional truing stand would, but it will markedly improve the wheel’s alignment. Proper spoke tension and rim inspection are your best tools for a quick, effective fix. With practice, you’ll develop a feel for how much tension adjustment is needed, enabling you to get your wheel back in shape and continue your ride safely.

LETUSPORT Bike Spoke Adjustment Wrench Bicycle Rim Truing Tool Set of 2
Material: Stainless Steel, 9H hardness
As an affiliate, we earn on qualifying purchases.
As an affiliate, we earn on qualifying purchases.
Frequently Asked Questions
How Often Should I Check Wheel Trueness?
You should check your wheel trueness regularly, ideally every few rides or weekly if you ride frequently. Keep an eye on spoke tension and wheel alignment, especially after impacts or rough terrain. Regular inspections help you catch any wobbles early, preventing more serious issues. Adjust spoke tension as needed to maintain true wheel alignment, ensuring smooth rides and prolonging your wheel’s lifespan.
Can I True a Wheel Without Special Tools?
Sure, you can try truing a wheel without special tools, but don’t expect perfection. You’ll eyeball rim alignment and guess at spoke tension, which is like trying to balance a teeter-totter in a windstorm. For better results and safer rides, use a spoke wrench and a truing stand. Otherwise, you risk creating uneven spoke tension or a wobbly rim that’ll make your bike handle like a drunken sailor.
What Are Signs My Wheel Needs Truing?
You’ll notice your wheel needs truing if you see rim wobble or uneven braking. Check for inconsistent spoked tension—some spokes may feel loose or tight compared to others. If the rim vibrates side to side or hits the brake pads unevenly, it’s time to true the wheel. Regularly inspecting these signs helps prevent further damage and keeps your ride smooth and safe.
How Long Does a Wheel Truing Process Typically Take?
Wheel truing usually takes between 15 to 30 minutes, depending on how severely your wheel is out of alignment. During bike maintenance, you’ll use a truing stand or your bike’s frame to make precise adjustments to the spoke tension. Stay patient and methodical, checking your work frequently. With practice, you’ll become quicker at wheel truing, ensuring smooth rides and reducing future repairs.
Is It Safe to Ride After Field Truing?
While it might seem tempting, riding immediately after a field truing isn’t always safe. You risk compromising wheel integrity and jeopardizing riding safety if the wheel isn’t perfectly true or if repairs aren’t thorough. Always check your wheel for cracks, proper tension, and stability. If unsure, take the time to inspect or consult a bike mechanic. Ensuring your wheel’s integrity before riding keeps you safe and confident on every ride.
![Mimoke Bicycle Wheel Truing Stand for 16 - 29 Inch Wheels [Width 90MM-150MM] Calibration Stand Wheel Maintenance Rims](https://m.media-amazon.com/images/I/319tg-rvy9L._SL500_.jpg)
Mimoke Bicycle Wheel Truing Stand for 16 – 29 Inch Wheels [Width 90MM-150MM] Calibration Stand Wheel Maintenance Rims
[Update] compatible to the wheel width [95MM-150MM]
As an affiliate, we earn on qualifying purchases.
As an affiliate, we earn on qualifying purchases.
Conclusion
Remember, a true wheel keeps your ride smooth and safe. When you notice wobbling or uneven braking, don’t ignore it—field truing is your quick fix. With a little patience and practice, you can straighten your wheel on the go. As the saying goes, “A stitch in time saves nine.” Address small issues early, and you’ll extend your wheel’s life and enjoy a better ride every time.

focopot Bike Cleaning Kit Including Bicycle Chain Cleaner Degreaser,Cycling Chain Lube,Cleaner Brush Tool,Scrubber,Suitable for Mountain/MTB,Ebike,Road Bike and Trail Bikes
【Bike Cleaning Kit】:focopot Bicycle cleaner kit includes chain lubricant, degreaser, chain scrubber, gear brush, wheel brush and chain…
As an affiliate, we earn on qualifying purchases.
As an affiliate, we earn on qualifying purchases.
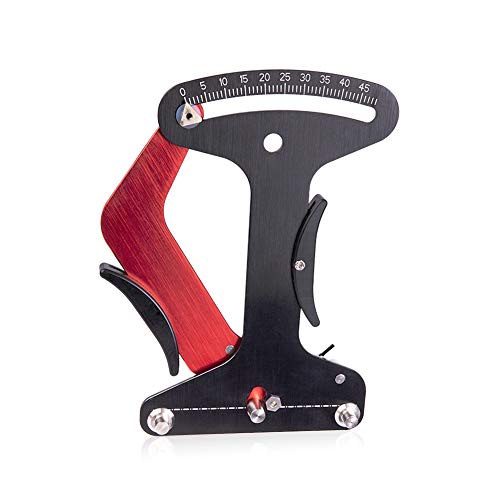
Bicycle Spoke Tension Meter Measuring Tool,Aluminum Alloy Wheel Repair Tool Road Bike Indicator Meter Tensiometer
Bicycle Tension Meter】This is a bicycle spoke tension meter, suitable for tension of round spokes or flat spokes….
As an affiliate, we earn on qualifying purchases.
As an affiliate, we earn on qualifying purchases.